Black Russian Chocolate Bundt Cake
I have always felt that the best recipes are the ones that have been tested through decades of family gatherings and holiday parties. This chocolate bundt cake is one of those treasures, originally found in my aunt’s old recipe binder and updated to work with the ingredients we use today. It has a beautiful texture and a hint of liqueur that makes it feel special, but the process is simple enough that it has become my favorite way to satisfy a chocolate craving.
Updating a Vintage Classic for Today’s Kitchen
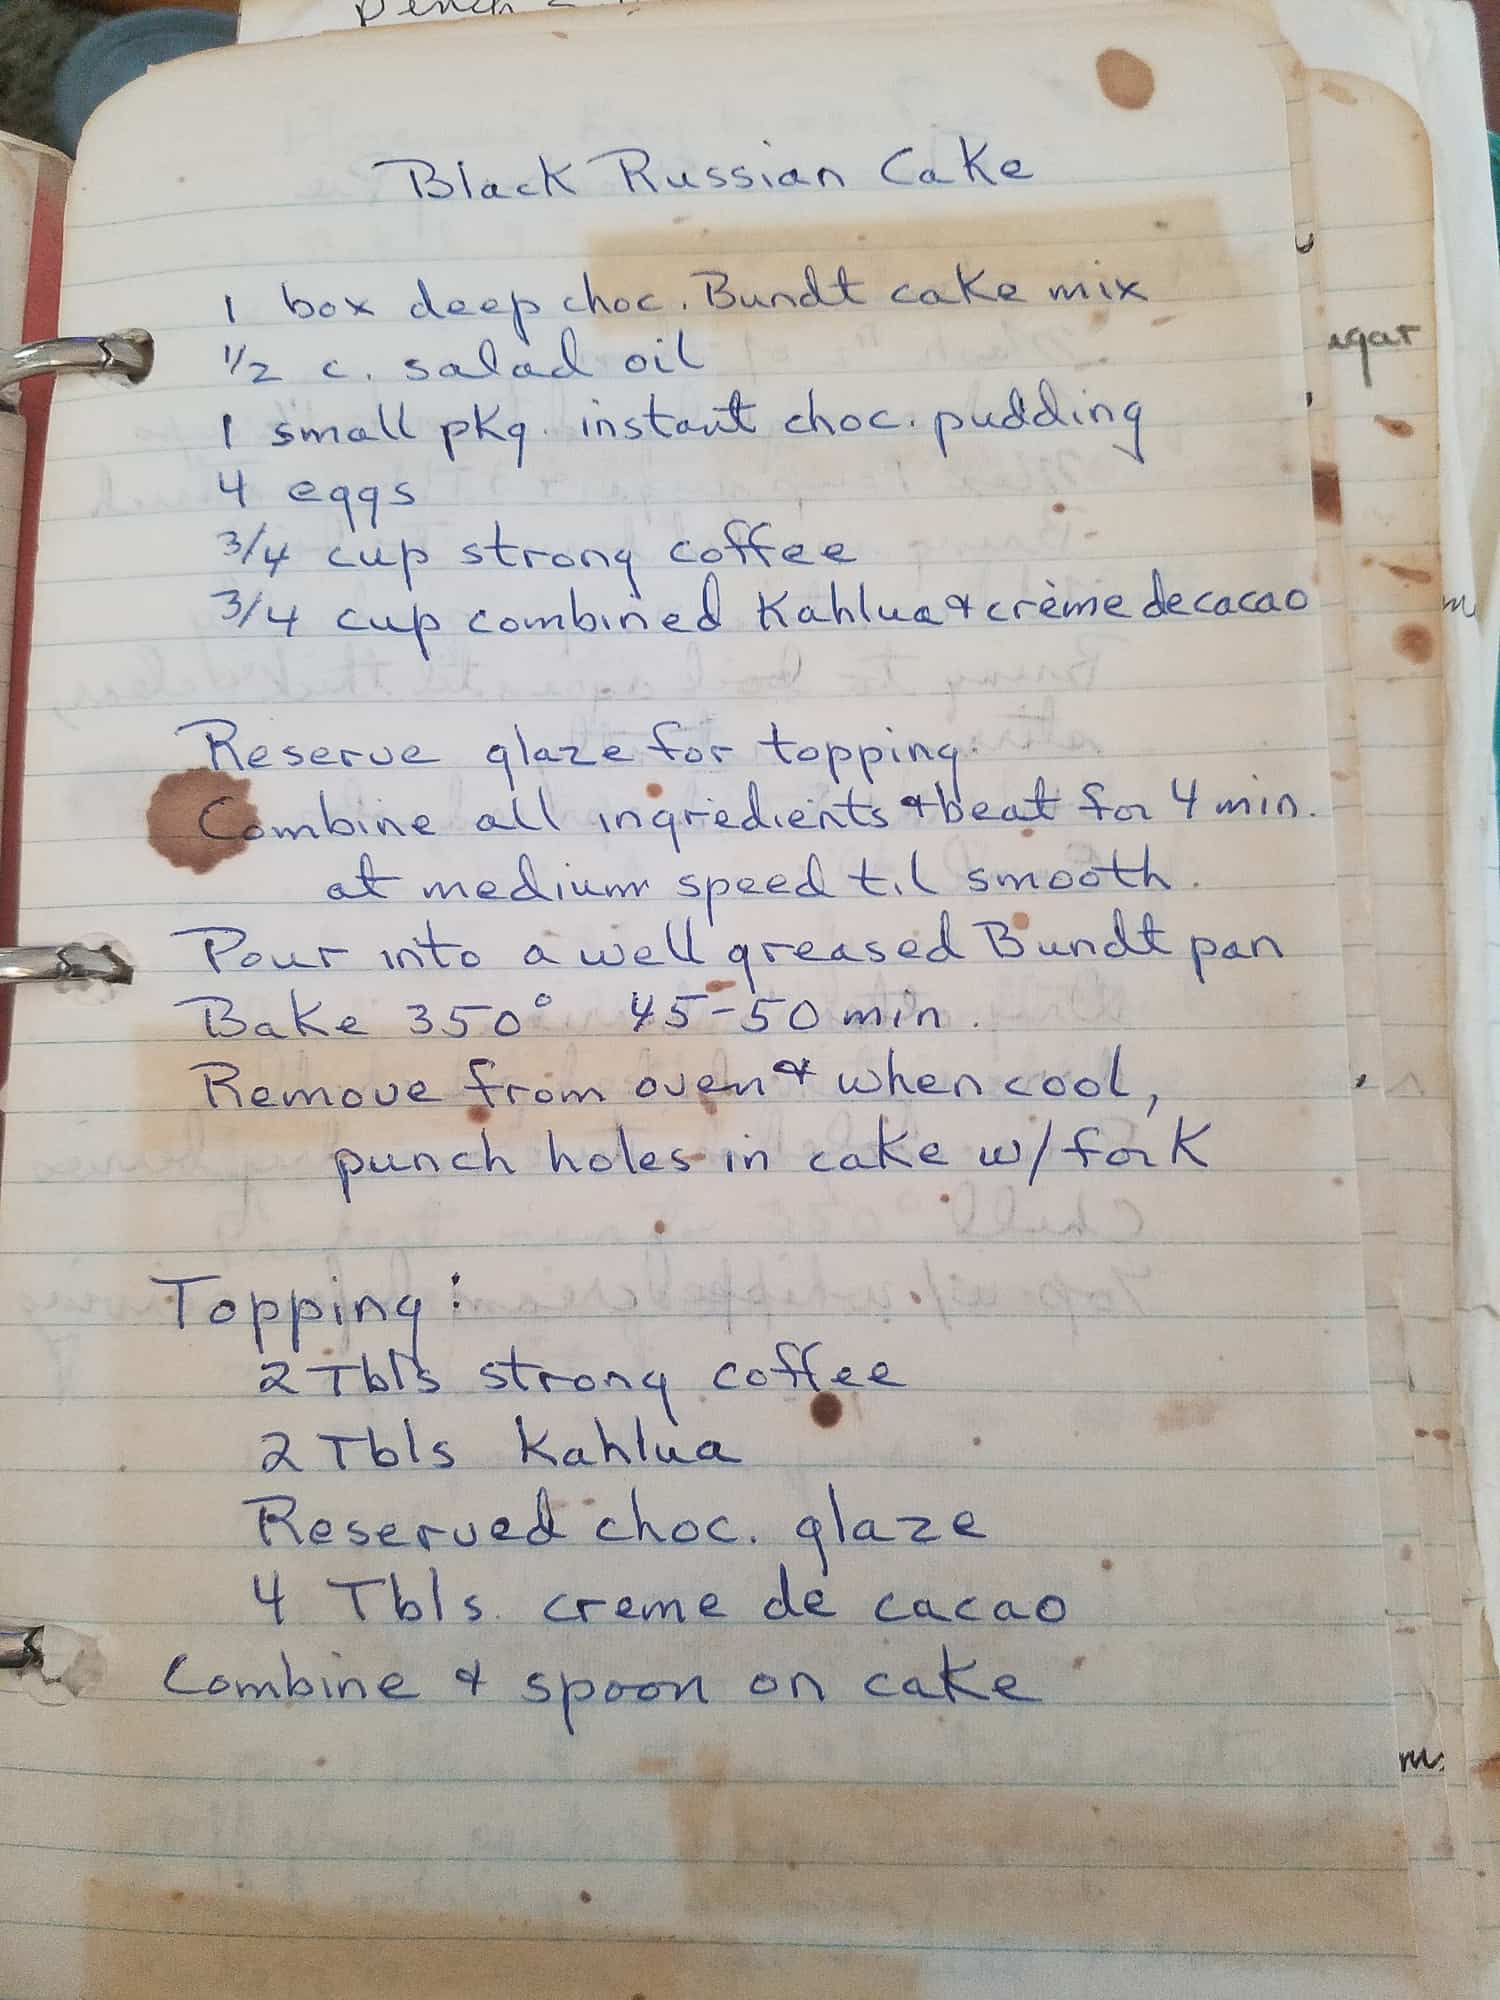
I still remember the first time I saw this recipe in my aunt’s binder. The page was splattered, which is usually the universal sign of a recipe that actually works. After she passed away, finding that handwritten note felt like a small inheritance of her kitchen wisdom. As I started baking it myself, I realized that the ingredients available today have changed quite a bit. Many modern cake mixes have shrunk in size, and those old-fashioned glaze pouches that used to come in the box are nearly impossible to find.
If you aren’t familiar with the drink that inspired this recipe, the Black Russian is a classic, two-ingredient cocktail made of vodka and coffee liqueur served over ice. It’s known for being bold, dark, and sophisticated. Think of it as the cousin to the creamier White Russian. This cake takes those exact components and translates them into a dessert; the coffee liqueur provides that deep base, while the chocolate liqueur (or a splash of vodka, if you’re feeling traditional) adds that signature cocktail “bite” that cuts through the richness of the chocolate.
I did not want to just copy and paste her notes because I wanted to honor them by making the cake work for a modern kitchen. In my testing, I found that the balance of the coffee and chocolate liqueur was the key to its success. Most people expect a boozy cake to be harsh, but the goal here is a smooth marriage of flavors. By swapping the old glaze for a chocolate ganache made from scratch, I have turned this into a dessert that tastes exactly how I remember my aunt’s house smelling. It is warm, rich, and it always feels a little bit special.
Choosing the Right Ingredients
The Secret to a Moist Crumb
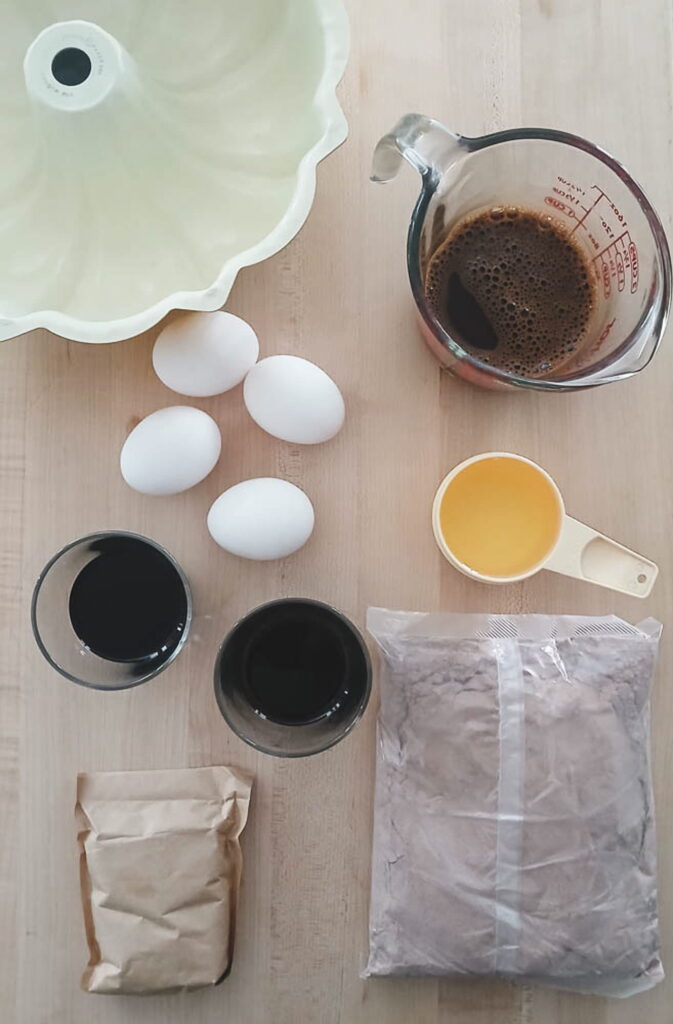
I love using a quality cake mix as a base because it allows me to focus on the flavors that really matter. Either a 13.25 ounce or 15.25 ounce mix works well here, but I usually reach for a Devil’s Food or a dark chocolate variety to ensure a deep color. The real secret to the velvety texture is adding a box of instant chocolate pudding, which keeps the crumb moist for days. When you are getting ready to bake, I recommend bringing your eggs to room temperature first. It is a small step that many people skip, but it helps the batter mix more evenly and results in a much better texture.
Coffee and Liqueur Pairings
The coffee and the liqueurs are where the personality of the cake really comes through. I prefer using three tablespoons of espresso powder dissolved in water because it creates a very strong concentrate that enhances the richness of the chocolate. You can certainly use a strong brewed coffee or even cold brew if that is what you have on hand. For the liqueurs, a classic coffee liqueur and a smooth chocolate liqueur are my favorites. If you do not have chocolate liqueur in your pantry, plain vodka is a great substitute to maintain that traditional cocktail bite, or you can simply use extra coffee to leave the alcohol out entirely.
I have included the specific measurements for everything in the recipe card at the bottom of this post.
The Secret to a Level Bake
For the most even rise in a heavy Bundt pan, make sure your eggs are at room temperature and your coffee/espresso has cooled before mixing. Using cold ingredients can “shock” the leavening agents in the cake mix, which often leads to an uneven dome or denser texture.
Tools for the Job
You do not need any fancy equipment to get this cake right, but a few simple tools make the process much easier. I always recommend using a heavy, high quality 10 or 12 cup bundt pan to ensure there is plenty of room for the batter to rise without overflowing. A sturdy stand mixer or a reliable hand mixer is helpful for getting that pudding filled batter light and aerated during the mixing process. Beyond that, a simple pastry brush for greasing the pan and a wire rack for cooling are the only things standing between you and a perfect chocolate cake.
Preparing the Pan and Mixing the Batter
The Cocoa Powder Trick
Before I even touch the ingredients, I focus on the most important step which is preparing the bundt pan. I have learned that a simple spray is not always enough for a recipe this moist, so I use a pastry brush to get my nonstick spray into every single curve and corner of the tin. My personal secret is dusting the greased pan with a little bit of cocoa powder instead of flour. It acts as a wonderful nonstick barrier, and it disappears into the dark chocolate surface so you do not end up with any chalky white spots on your finished cake.
Mixing for a Velvety Texture
Once the pan is ready, you can move on to the batter. I start by combining the cake mix, pudding, and liquids on low speed just until the dry streaks disappear. One of the first things you will notice is just how thick the batter becomes. Because we are adding a full box of instant pudding along with the coffee and liqueurs, the consistency is much heavier than a standard cake. I always suggest resisting the urge to add more liquid because that thickness is exactly what creates the tight and velvety texture.
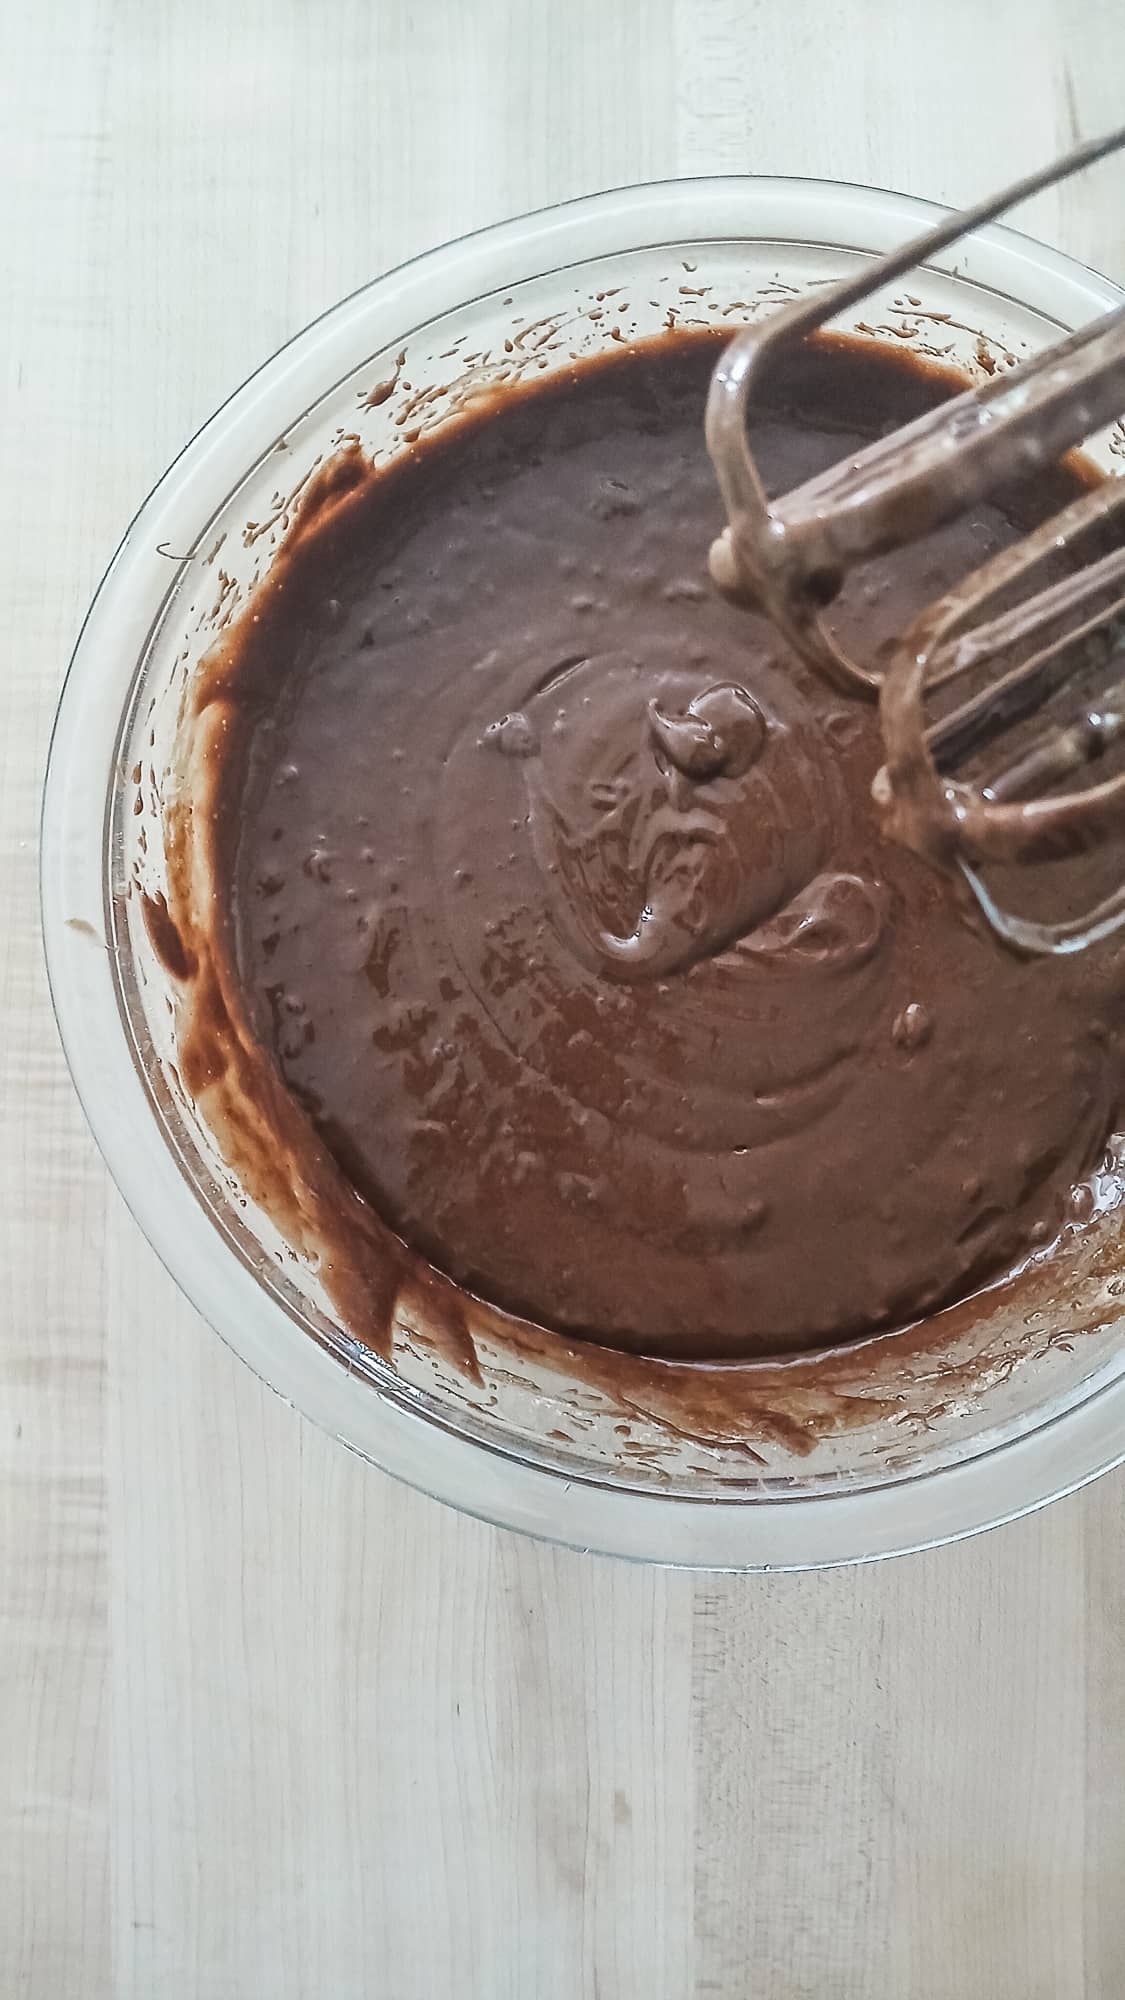
To get the best result, I turn the mixer up to medium and beat the mixture for a full two minutes. You are looking for the batter to become slightly lighter in color and very smooth.
After pouring it into the prepared pan, I use a spatula to level the top so it bakes evenly. I bake it at 350 degrees for about 45 to 50 minutes, or until a tester comes out clean. I always let the cake cool in the pan for at least 30 minutes before I attempt the flip because this allows the structure to set, so it does not break apart.

The Finishing Touches
Tips for a Glossy Ganache
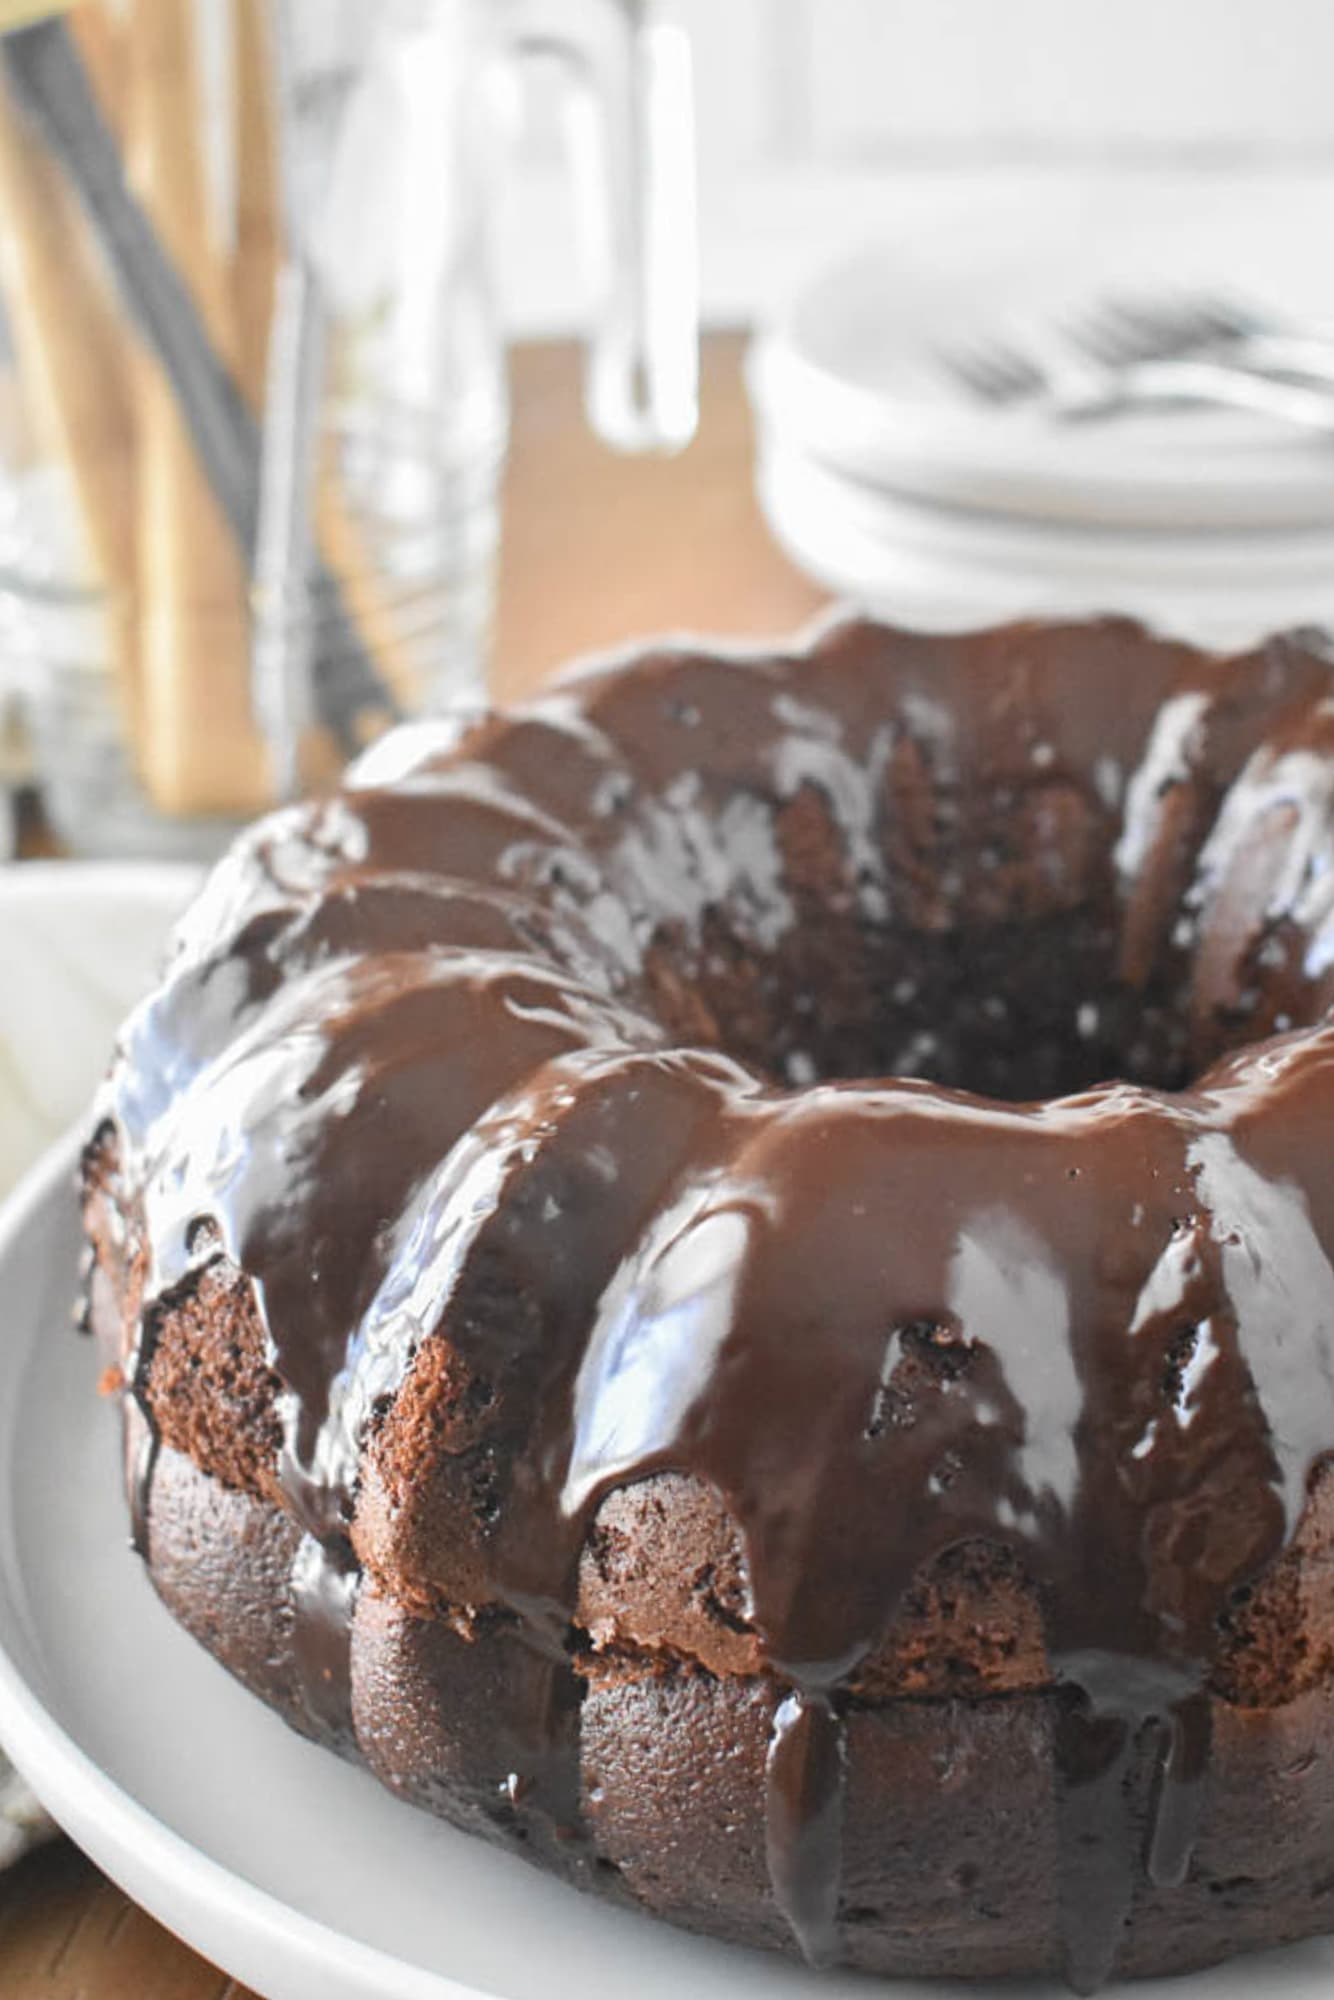
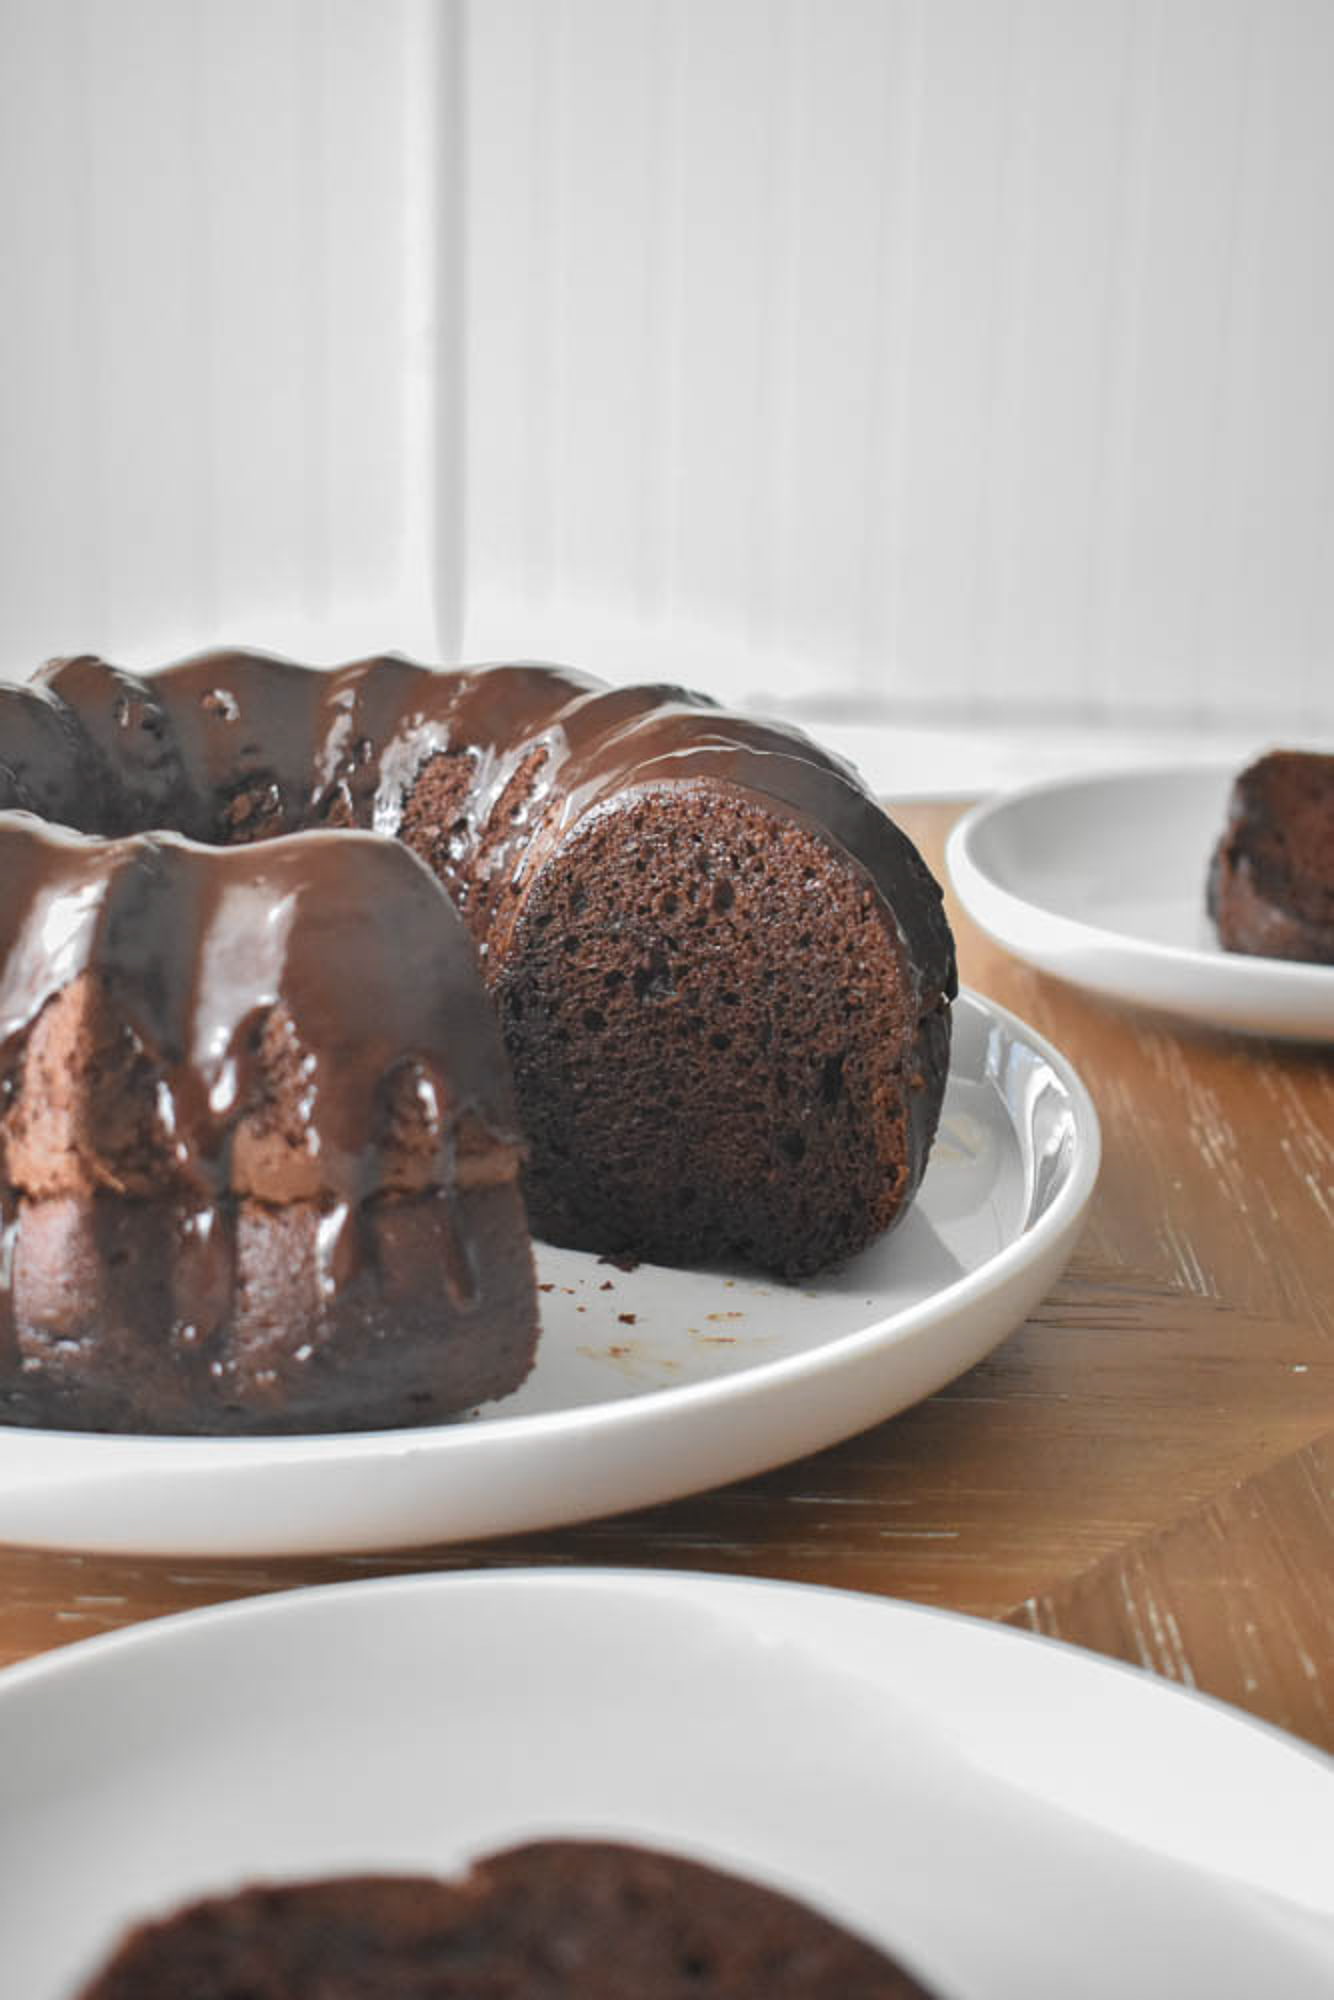
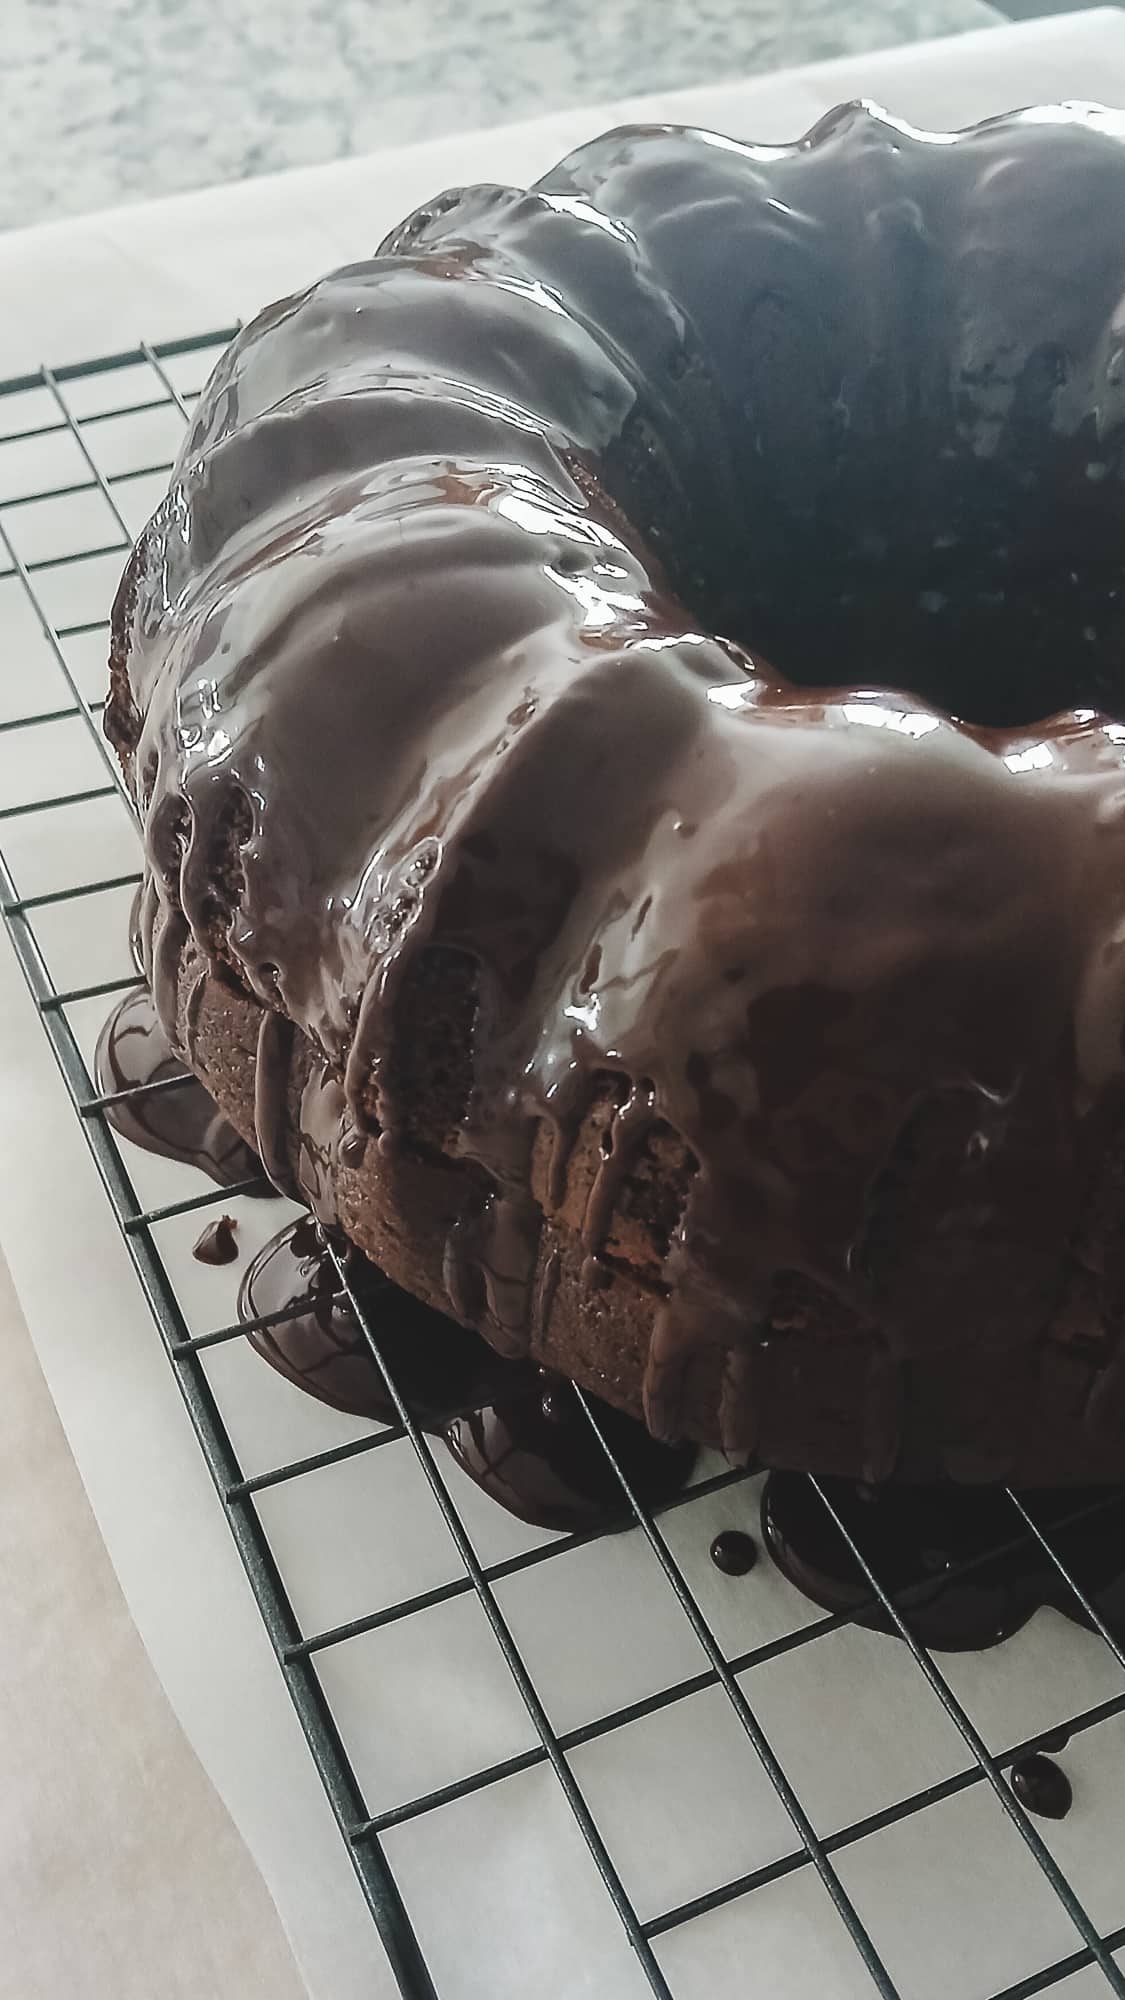
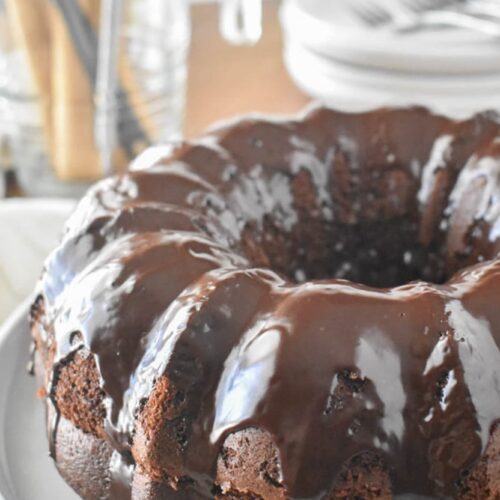
The final step that truly elevates this cake is the chocolate ganache. While the original recipe used a packaged glaze, making your own from scratch is incredibly simple and results in a much richer finish. I like to use a mixture of semi-sweet chocolate chips and heavy cream because it creates a beautiful shine that stays soft even after it sets.
The secret to a smooth ganache is patience. I heat my cream until it’s hot to the touch but nowhere near a boil. Then, I pour it over the chocolate chips, letting it sit for a few minutes before stirring. This allows the chocolate to melt gently without becoming grainy. Once it is glossy and smooth, I pour it slowly over the cooled cake, letting it drip down the sides in those signature bundt ripples. It is the kind of detail that makes a simple cake look like it came from a professional bakery.
The Mirror Shine Fix
If your ganache looks a little dull or grainy after adding the liqueur, don’t panic. You haven’t ruined it! Sometimes the temperature change causes the chocolate to “break.” Simply whisk in one extra teaspoon of warm heavy cream; the added fat will help everything come back together into that beautiful, glossy finish we’re looking for.
Notes for Success
I have found that a few small details make all the difference in how this cake turns out. When it comes to the coffee, you do not have to use espresso powder if you have a favorite cold brew or a strong pot of coffee already made. I simply use the powder to create a concentrate that intensifies the chocolate.
Working with ganache can sometimes be tricky if the temperature in your kitchen is off. If your glaze seems too thin, let it sit on the counter for a few minutes to thicken naturally. If it feels too thick to pour, a very brief few seconds in the microwave will bring it back to a pourable consistency. I always like to test a small spoonful on the side of a bowl first to make sure it will create those perfect drips before I pour it over the entire cake.
Make it Your Own
Customizing the Liqueur and Flavor
One of the reasons this recipe has stayed in my rotation for so long is how easily it can be adapted. If you want to make this cake completely alcohol free, you can simply replace the liqueurs with extra coffee in both the batter and the ganache. The cake remains incredibly moist and flavorful even without the spirits. For those who want to lean even further into the coffee notes, I recommend adding a pinch of espresso powder to the warm cream when making your ganache.
If you are looking for a more traditional cocktail flavor, you can make the glaze a bit boozier by swapping an ounce of the heavy cream for an extra ounce of liqueur. I just caution you not to change the liquid to chocolate ratio too much, or the ganache may not set properly on the cake. If you prefer a lighter finish than a rich ganache, a simple mixture of one cup of powdered sugar and a few tablespoons of coffee liqueur creates a beautiful translucent glaze that is just as delicious.
Keep it Fresh
Because of the instant pudding in the mix, this is one of those rare cakes that actually seems to get better with a little time. If you have leftovers, it stays incredibly moist for three or four days in an airtight container on the counter. In fact, I often prefer the flavor on day two once the ganache has fully set and the coffee notes have had a chance to really settle into the chocolate.
If you are planning ahead, this is a wonderful cake to bake a day in advance. The structure settles beautifully overnight, and you can simply add the fresh ganache on the day you plan to serve it. While you can store the cake in the refrigerator for up to five days, I highly recommend bringing it back to room temperature before serving. This allows the ganache to soften and the chocolate flavors to really wake up, making it the ultimate “make ahead” dessert for a stress-free dinner party.
Black Russian Chocolate Bundt Cake
Ingredients
Cake
- 1 chocolate cake mix (I used Devil's Food)
- 1 box instant chocolate pudding | 3.9 oz | 111g
- 1/2 cup vegetable oil
- 4 eggs
- 3/4 cup strong coffee, cooled
- 6 tablespoons coffee liqueur, Kahlúa or similar | ~3 oz
- 6 tablespoons chocolate liqueur, Crème de Cacao or similar | ~3 oz
Glaze
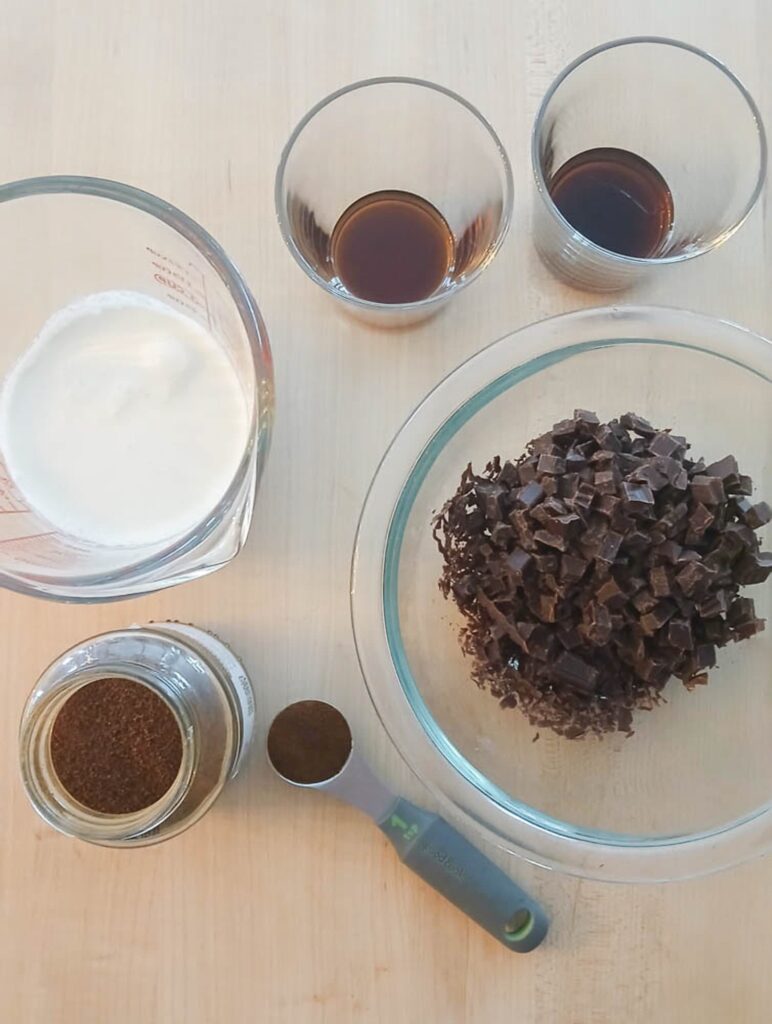
- 1 bittersweet chocolate baking bar | 4 oz | 113g
- 6 tablespoons heavy cream | ~3 oz
- 1 teaspoon instant coffee or espresso powder
- 2 tablespoons coffee liqueur, Kahlúa or similar | ~1 oz
- 1 tablespoon chocolate liqueur, Crème de Cacao or similar | ~0.5 oz
Instructions
Prepare the Cake
- Preheat Oven: Preheat your oven to 350°F.
- Grease the Bundt Pan: Grease a bundt pan with nonstick spray or a light dusting of cocoa powder. Set aside (see notes above for more tips on properly greasing your cake pan).
- Combine Dry Ingredients: In a large mixing bowl, whisk together the dry cake mix and instant pudding mix.1 chocolate cake mix (I used Devil's Food)1 box instant chocolate pudding | 3.9 oz | 111g
- Add Wet Ingredients: Add the oil, eggs, cooled coffee, and both liqueurs to the dry ingredients.1/2 cup vegetable oil4 eggs3/4 cup strong coffee, cooled6 tablespoons coffee liqueur, Kahlúa or similar | ~3 oz6 tablespoons chocolate liqueur, Crème de Cacao or similar | ~3 oz
- Mix the Batter: Beat the mixture on medium speed for 2 minutes. Scrape down the sides and bottom of the bowl, then beat for 1 more minute. The batter will be thick.
- Pour the Batter: Pour the cake batter into the greased bundt pan, spreading it evenly.
- Bake: Bake the cake for 40-45 minutes at 350°F , or until a toothpick inserted into the center comes out clean and the cake bounces back when lightly pressed.
- Cool: Allow the cake to cool in the pan on a cooling rack for at least 30 minutes. The cake should start pulling away from the sides of the pan as it cools.
- Invert the Cake: Gently invert the cake onto the cooling rack to cool completely. You may need to use a silicone or rubber spatula to help loosen the cake before turning it over.
Prepare the Glaze
- Chop the Chocolate: Chop the bittersweet chocolate bar into small pieces.1 bittersweet chocolate baking bar | 4 oz | 113g
- Heat the Cream: In a microwave-safe glass measuring cup or bowl, heat the heavy cream for 30 seconds. Add the instant coffee or espresso powder and stir until dissolved. Microwave for an additional 20 seconds.6 tablespoons heavy cream | ~3 oz1 teaspoon instant coffee or espresso powder
- Melt the Chocolate: Add the chopped chocolate to the hot cream. Push the chocolate down with a spoon so it’s fully submerged. Let it sit for 1 minute.
- Mix the Ganache: Stir the chocolate and cream mixture until smooth. Add the coffee liqueur and chocolate liqueur, stirring to combine. If needed, microwave for another short interval to ensure the chocolate is fully melted and smooth. The glaze should be thin enough to pour.2 tablespoons coffee liqueur, Kahlúa or similar | ~1 oz1 tablespoon chocolate liqueur, Crème de Cacao or similar | ~0.5 oz
- Glaze the Cake: Place your cake on a cooling rack over a baking sheet (or line your countertop with parchment paper for easy cleanup). Pour the glaze over the top of the cooled cake, letting it drip evenly down the sides. If the ganache becomes too thick, microwave briefly to thin it out.
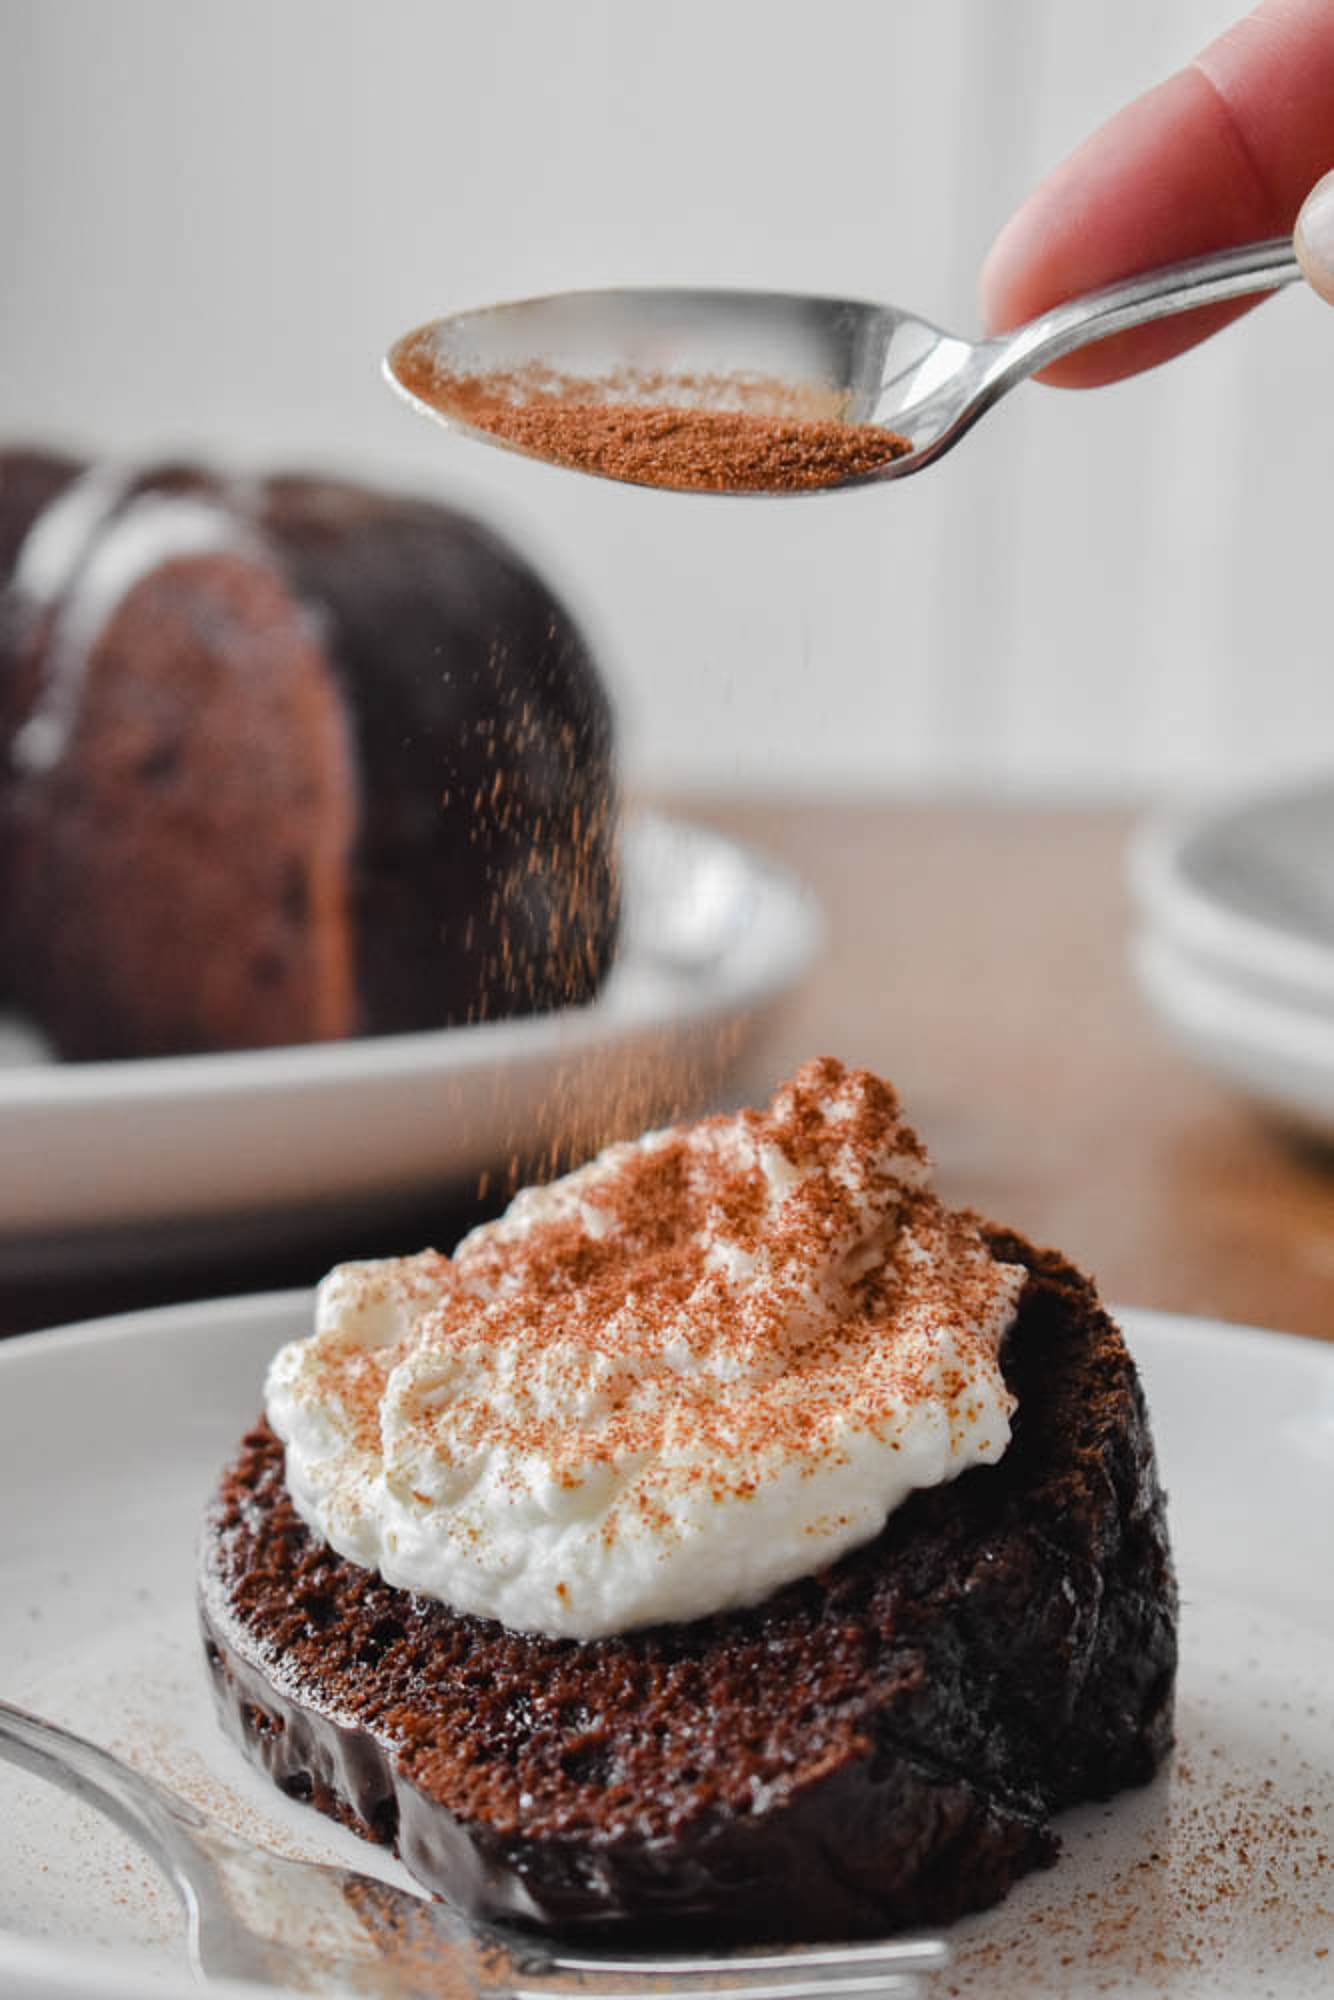
- Set and Serve: Let the glaze set before transferring the cake to a serving platter or cake stand. This cake is delicious served plain, either warm or cold. For an extra treat, serve with vanilla or coffee ice cream, or top with whipped cream and a sprinkle of espresso powder.
Did you try this recipe?
Share your experience in the comments below!
I’d love to hear how it turned out
Let’s see your creations!
Share your photos
Tag me @flourtinbakes on social media